This user guide is updated using Microsoft Word, saved as a PDF so you can upload from here.
The 05 November 2020 version is not being updated.
I expanded on the two page User Guide supplied with the FLXS desk to provide more guidance to people not familiar with using a new theatre lighting desk.
FLX S24 Short User Guide – Don Allen 05 November 2020
Introduction
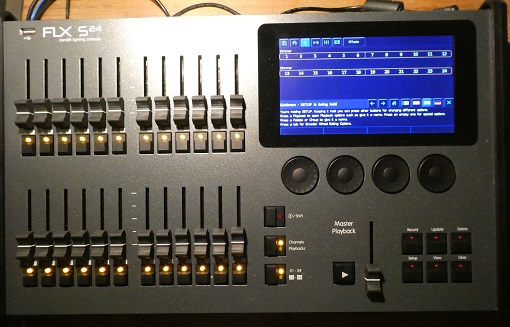
This Short User Guide will provide with a brief overview of the setup and operation of the FLX S24 console shown below with the Image Picker screen & FLX S48 console with the Colour Picker screen .

Getting started
Power on
Plug in the power adaptor, DMX lead, external monitor if FLX S48, possibly a USB 4 port passive hub to use a USB keyboard and mouse, so that when you power up the console it can autodetect all connections. Turn on the power supply and FLX S will take about 30 seconds to power up automatically. During startup, the fader LED’s will flash sequentially for several cycles as the first part of start up, followed by an initialising sequence and a progress bar on the LCD display.
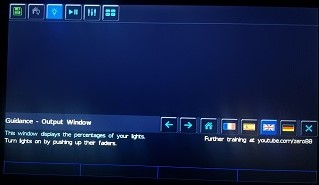
If the console has not been used before, or has had a factory reset, there will be nothing in the top two thirds of the Output Window, the Guidance (Help) messages will appear on the bottom third of the Output Window lcd touch screen and RigSync is enabled.
Nothing will happen when you bring up a fader, so you have to Patch the desk .

Patching the desk
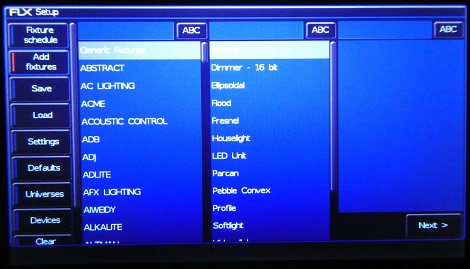
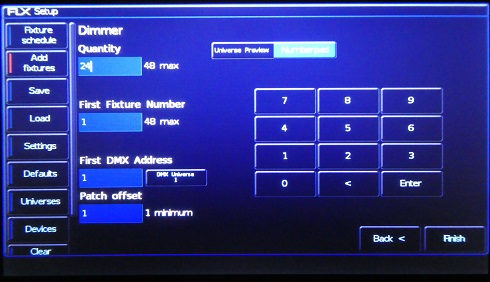
Press Setup> Add Fixtures> Generic Fixtures> Dimmer> Next> Quantity 12, Fixture Number 1 , DMX Address 001 > Finish. Deselect Setup, desk will show Output Window with Channels 1 – 24 Dimmers
This section of photos to be split up with explanation of what is done.
End result is desk patched with 24 dimmers, all channels set to 100% or Full, Z key deselected.
To quickly turn off all channels, Press Clear Key twice, or press Z key and wheel down using Intensity Wheel.

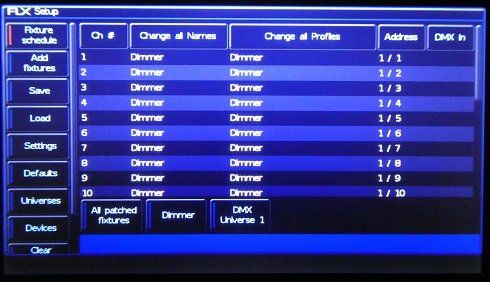
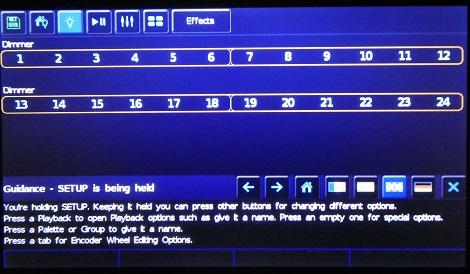

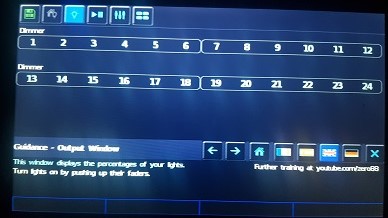
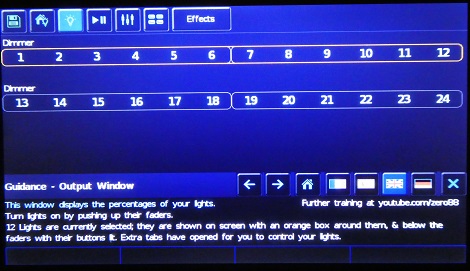
If a show has been saved, the top two thirds of the Output screen will show what Fixtures are patched in the desk. In this example, 24 dimmer channels have been patched as fixtures 1 to 24. The Guidance notes for the Output Window will be shown on the bottom third of the screen.
Power off
There is no procedure needed to power off FLX S. Ensure the “save” icon is green which is a floppy disc icon on the top left of the touch screen and just unplug power. If the save icon is not green, press Setup > Save Show on the left side of the LCD display.
Introduction
To download the full manual, please visit zero88.com
Training videos available on – youtube.com/zero88
Turning Lights On
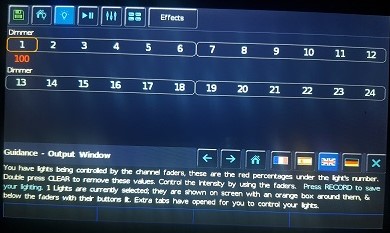
If the FLX S 24 or 48 desk has been set up for your venue, when in Channels mode, bringing up a channel fader turns that light or fixture on, if there is a working light on that channel. In this example, bringing up Channel 1 fader to Full is shown as a level of 100% in red will turn that light on. Bringing up other faders will turn on those lights.
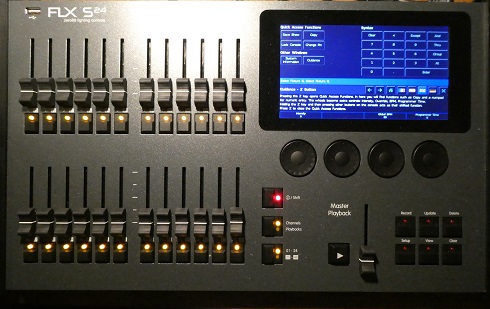
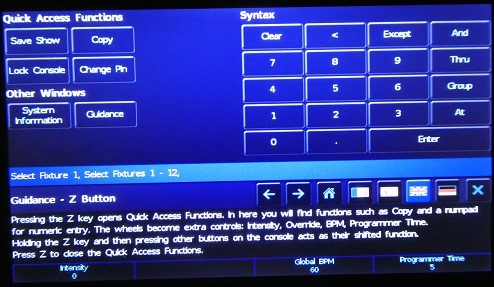
To quickly turn on a group of lights, press the Channel Select button on the lights you want to turn on, then press the Z button. This will switch the lcd display to the Quick Access Function screen. Above the first wheel, you will see Intensity. You can turn this wheel to control the intensity of all of the lights selected. Deselecting the Z button returns you to the Output Window and the Intensity Wheel is deselected.
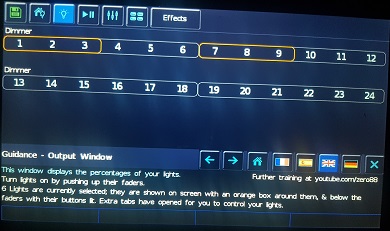
If you want to select a range of lights, for example the first 12 dimmer channels, Hold down the first channel in the range, then press the last channel in the range. This will select all of the channels from 1 to 12, then you can press the Z button and use the Intensity wheel to control the levels of all of the channels.
When in Playbacks mode, bringing up a Playback or scene fader will bring up a group of fixtures that have been recorded in that Playback.
If these playbacks have been named, you will see the names in the display.
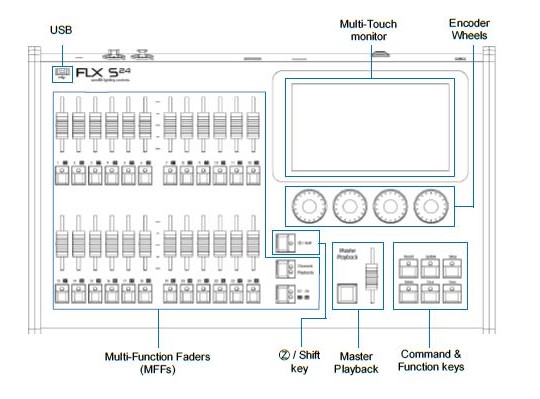
FLX S24
FLX S24 is a 19” wide console, capable of controlling 48 physical fixtures (LEDs, dimmers, moving lights, etc), using two pages of 24 faders.

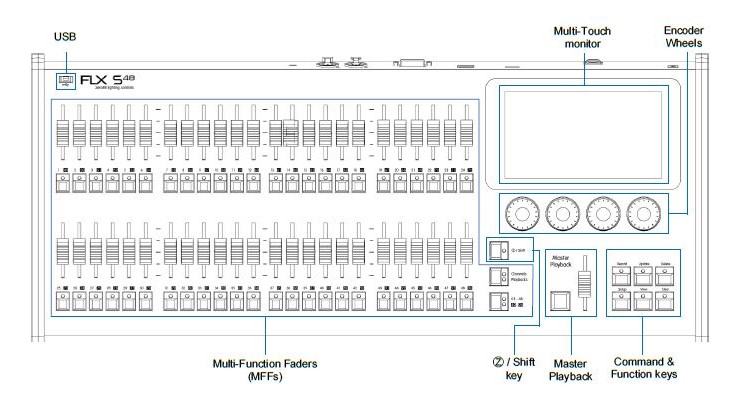
FLX S48
FLX S48 is a 19” wide console, capable of controlling 96 physical fixtures (LEDs, dimmers, moving lights, etc), using two pages of 48 faders.

Multi-Function Faders (MFFs)
FLX S consoles are equipped with either 24 or 48 Multi-Function Faders. These can quickly and easily be switched between their two functions (“Channels” and “Playbacks”) by using the Fader Function button.
Channels
When set to “Channels”, the faders directly control each light (or “fixture”) in the rig. Each fixture, no matter what it is, will have a single “Channel Number”, and so will take up a single channel fader. FLX S consoles support double the number of fixtures as there are faders. The Page button can be used to switch the faders between fixtures (see below).
Playbacks (or cues, stacks, submasters or chases)
Lighting “states” (or “scenes”) can be pre-recorded, ready to be recalled later. They are called “cues”, and are recorded onto “playbacks”. Each playback can store a single cue, or multiple cues or “cue stacks”. FLX S consoles support double the number of playbacks as there are faders, plus the “Master Playback”. Traditionally, playbacks with a single cue have often been referred to as “submasters” whereas playbacks with multiple cues have often been referred to as “cue stacks”. We simply call them all playbacks.
The Master Playback does not change function when Channels/Playback is pressed.
Page
On FLX S, the page button allows you to switch between faders 1 – 24 and faders 25 – 48 (on FLX S24) or faders 1 – 48 and faders 49 – 96 (on FLX S48). Switching between “Channels” and “Playbacks” will automatically change the page to the page you had previously selected when in that function.
Connections
Having all external cables connected before powering on the console allows the console to detect what devices are connected, such as mice, keyboards, USB thumb drives or monitors for FLX S48.
DMX output
Two XLR connectors are provided – one 5pin, one 3pin. On standard 1 Universe consoles, both connectors output the same DMX data and so either can be used, but the 5 pin will include RDM and the 3 pin won’t include RDM. This can be changed in SETUP>Inputs & Outputs. On consoles which have been upgraded to two Universes, the 5pin connector outputs Universe 1, and the 3pin connector outputs Universe 2.
USB ports
Two USB 2.0 ports are provided – one on the rear, one on the front panel. USB ports can be used for:
– Keyboard & Mouse (mouse is used on external monitor only)
– Touchscreen (DVI-D also required, FLX S48 only)
– External Storage Devices (such as Memory Sticks)
Ethernet port
An Ethernet port (RJ45) is provided for connecting Apps to FLX S over WiFi, or connecting FLX S to Ethernet based lighting rigs. The Ethernet connection is designed to be used within a dedicated, local lighting network, and not part of a larger, building wide network.
The FLX S24 does not have DVI-D connector, only the FLX S48 has one.
Kensington Lock
A Kensington-style lock slot is provided on FLX S for securing the console to an operating location, using a standard laptop lock cable.
Power supply
FLX S is supplied with an external power supply, which is connected to FLX S via a 2.1mm DC barrel connector (center positive). 12V DC; MAX 1.25A, 15W
The approved Zero 88 power supply included with the FLX S should always be used. This power supply should be earthed.
Navigating the touchscreen
Save – FLX S automatically saves you’re work internally, indicated by a green icon. Press this icon to save to an external USB drive. | |
Output window – this window displays each fixture and its current intensity as a percentage. | |
Cue list window – this window displays the list of cues on a specific playback, ready to be progressed by pressing the GO button. | |
Playback window – this window displays the current functionality of the 24 or 48 faders on the left hand side of the console. | |
Groups window – this window is used to select fixtures that are often used together. Groups can be automatically or manually created. |
RigSync for Newer Stage Lighting
When FLX S is first plugged into a lighting rig, “RigSync” will set it up automatically and continue working in the background to ensure FLX S and your rig are always synchronized and problem free. RigSync removes the need to understand DMX (if your fixtures support “RDM”). To disable RigSync Setup>Universes>RDM>RigSync>Disabled.
Patching Older Stage Lighting
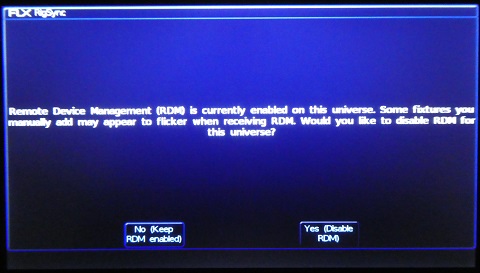
If your fixtures do not have Remote Device Management such as dimmers made before 2010 which are used by your conventional lights or basic LED stage lighting, then you need to manually patch your lighting. To patch a dimmer rack press Setup, then ADD Fixtures from the left hand side. The default selection is Generic Fixtures > Dimmer, type in the number of channels you have, select Finish, select Disable RDM for initial use. The Channel LED’s will light up to show how many dimmer channels you have patched. Press Setup to deselect Setup mode and the touch screen will show the dimmer channels patched. Bringing up a channel fader shows the level of intensity of your lights connected to that dimmer channel.
The Master Playback does not affect Channel levels unless it is changed to a Grand Master mode by holding SETUP and tap the Master Playback GO button, then select Grand Master > OK > Button Function Flash or Latch > OK.
Guidance (help)
Available in multiple languages, “Guidance” steps you through the key features of FLX S at your own pace, to learn or refresh your skills. Guidance will be automatically open on the bottom 3rd of the internal screen, and will follow your progression through the console. If closed, Guidance can be reopened by pressing Ⓩ and choosing “Guidance” on the internal screen.
Terminology
Fixtures
Every device controlled by FLX S is known as a “Fixture”, and is assigned a “Channel Number”. Fixtures can be a simple generic dimmer channel, or a more complex DMX device such as a colour scroller, LED fixture, moving head, strobe light or smoke machine.
Multi-Function Faders (MFFs)
FLX S24 is equipped with 24 “Multi-Function” Faders. FLX S48 is equipped with 48. These can quickly and easily be switched between their two functions (“Channels” and “Playbacks”) by using the Fader Funct. button.
Channels
When set to “Channels”, the faders directly control each light (or “fixture”) in the rig (this is often referred to as “Channel per Fader”). Each fixture, no matter what it is, will have a single “Channel Number”, and so will take up a single channel fader. FLX S consoles support double the number of fixtures as there are faders. The Page button can be used to switch the faders between fixtures (see below). |
Playbacks (or cues, stacks & submasters)
Lighting “states” (or “scenes”) can be pre-recorded, ready to be recalled later. They are called “cues”, and are recorded onto “playbacks”. Each playback can store a single cue, or multiple cues. FLX S consoles support double the number of playbacks as there are faders, plus the “Master Playback”. Traditionally, playbacks with a single cue have often been referred to as “submasters” whereas playbacks with multiple cues have often been referred to as “cue stacks”. We simply call them all playbacks. |
Page
The page button allows you to switch between faders 1 – 24 and faders 25 – 48 on FLX S24, or faders 1 – 48 and faders 49 – 96 on FLX S48. Switching between “Channels” and “Playbacks” will automatically change the page to the page you had previously selected when in that function. |
“Ⓩ” / Shift key
Ⓩ places a range of quick access settings & functions on the internal display and encoder wheels. Holding Ⓩ acts as “Shift”, changing the functionality of other buttons when pressed simultaneously. |
Master Playback
For many shows, especially theatrical, a single playback is often used with a list of pre-recorded cues. For these situations, the “Master Playback” is provided, with dedicated fader & quieter ► (“go”) button. |
Command keys & function keys
FLX S includes dedicated keys for the commands Record, Update and Delete, and the functions Setup, View and Clear. Function keys perform functions themselves but also change the functionality of other buttons when pressed at the same time. |
Internal, external & remote monitors
The internal multi-touch screen displays the graphical interface for FLX S. Multiple mobile devices, such as smart phones, tablets and laptops, can also be connected simultaneously to show additional information or to add remote control functionality. Additionally, FLX S48 supports an optional external DVI-D monitor.
Encoder wheels
Four encoder wheels are provided, and used for accurate control of various settings. The settings currently being controlled by the four encoders are displayed in the four boxes along the bottom of the touch screen, just above the encoders. |
Groups
Fixtures that are used together regularly (such as a colour wash, or all the moving lights on a specific bar) can be stored together into a “group”. FLX S can automatically create groups if required.
Chases
Chases are sequences of lighting states (“steps”) that automatically cycle. Settings can change between “flashing” and “fading”. See manual for full details.
Effects
Effects can be applied to a fixture to create continuously changing lighting states – for example a rainbow or movement circles. Unlike chases, they can be stored in a single cue and are based upon waveforms (such as a sine wave or sawtooth wave etc).
Troubleshooting
Fixtures not responding?
If your fixtures and dimmers are not responding to the desk, check:
– Have you plugged the DMX cable into the back of the console?
– If the fixtures do not support RDM, they must be added (or “patched”) manually – see the manual for full details.
– If you have upgraded your FLX S, ensure the DMX cable is plugged into the correct output
– Some fixtures require the lamp to be “lamped on”. If this is required, a “Macros” button will be displayed along to top of the screen when the fixture is selected. Selecting macros will display a “Lamp On” command.
External Touch Screen not responding?
On FLX S48, if the external touchscreen is not responding, remember these points:
– External Touch Screens require both the USB and DVI-D cables to be connected.
– External Touch Screen require calibration by going to Setup > System Settings > Calibrate
Remote App not connecting?
If the remote apps are not connecting to the console, check one of the following things:
– Is the Remote enabled in Setup > Remote?
– Is there a password set in Setup > Remote?
– Are you using a dedicated network, or plugging into a much larger network? On larger networks, firewalls can sometimes block the communications.
– Is the IP address of the console in the same range as the IP address of your remote device? For simple setups where nothing else is using the network apart from the remote, we suggest either enabling DHCP on both devices (which will set the IP address automatically) or use the IP addresses 192.168.1.10 on FLX S and 192.168.1.20 on your remote device.
Console does not start correctly?
In this situation, follow these steps:
– Remove all USB storage devices from the console
– Check internal monitor for any error messages or warning information
– Hold Shift on a USB keyboard to get to diagnostic mode. Perform a Backup Desk State and email this to Zero 88 (see contact details on right).
– Hold Shift on a USB keyboard then “clear show data”
– If all else fails, reinstall the software as a last resort
Basic maintenance
FLX S is designed to be relatively maintenance free, however a few simple steps can prolong the life of your hardware.
Cleaning the surface
Every month or so, gently wipe down the front panel with a nonabrasive, non-corrosive surface cleaner applied with a soft cloth.
Cleaning the faders
A can of compressed air can be used to clear our dust from the fader tracks. Do NOT use an oil based lubricant (such as WD-40) on faders as this will cause irreparable damage to your FLX S.
Transportation & storage
Care should be taken when transporting FLX S. Flight cases are available (listed under “accessories” on the first page of this guide) for the transportation of FLX S – the cardboard box which FLX S is supplied in is intended only for one or two journeys, and should not be relied upon to keep the console safe for prolonged use.
Operating environments
Always observe the operating environment information in the main FLX S manual. If this environment is exceeded, it is likely that damage will occur to your FLX S. To download the full manual, please visit zero88.com
Contacting Zero 88
Zero 88 can be contacted by phone, email or forum:
✉ support@zero88.com
☏ +44 (0)1633 833101
✍ zero88.com/forum
Notes
Eaton Lighting Systems reserves the right to make changes to the equipment described in this manual without prior notice. This equipment is designed for professional stage lighting control, and is unsuitable for any other purpose. It should be used by, or under the supervision of, an appropriately qualified or trained person.
E&OE. Eaton Lighting Systems reserves the right to change the specification without prior notice.
© Eaton Electrical Systems (t/a Eaton Lighting Systems)
How To Update FLX S Software
Simply download the software, and extract the software file to the root of a USB stick. Plug the USB stick into the console, tap SETUP -> Load File, and choose the software file application. The console will then perform the installation. Software updates will remove the current show file from the console, so make sure you’ve saved a copy to USB if you would like to load it back into the console afterwards.
FLX S24 & FLX S48
Manual
You can download the FLX S24 & FLX S48 User Manual and the FLX Range & ZEROS ACCESSORIES User Manual on Zero88.com for full details of console’s operations. They only provide a FLX S Quick Start Guide with the desk.
YouTube training
Training courses, product overviews and other videos for the FLX S consoles are available on the YouTube channel – youtube.com/zero88
Software
FLX S runs ZerOS software, which is regularly updated to bring new features and to keep your console stable and secure. Software updates are free of charge and can be downloaded from zero88.com/software. It is strongly recommended to always be running the latest release of software. An offline editor Phantom ZerOS is also available as a download.
Universe upgrades
FLX S supports one DMX “universe” (up to 512 DMX channels). FLX S can be upgraded, enabling you to spread your fixtures across two DMX “universes” (up to 1024 DMX channels). Visit zero88.com/software/zeros/upgrade for more information.
Throughout this guide, references to front panel control and buttons appear in a solid border. For example Encoder Wheel . Soft buttons, which appear on the monitor, are in a dotted border, for example Next , Picker .