First Year Lighting Electronics Timeline
Week 1 – Workshop Safety Induction for Soldering – Eye protection, Fume extractors, Burns avoidance.
Drilling – Eye protection, Work clamping, Awareness of sharp moving parts.
Electrical Safety – Isolation, Eliminating electric shock hazards, Using extra low voltage.
Introduction to DC circuits – Resistance, Current, Voltage, power.
Resources – Electronics phone apps – Electrodroid free, web resources – Adafruit, Sparkfun, Fritzing.
Week 2 – Design and Construction of Buzz Boxes start. Circuit explanation. Supervision of drilling and soldering work is required to achieve competency in workshop tasks.
Week 3 Complete construction of Buzz Boxes. Needed for prac work in theatres.
Week 4 – First Year project discussion, look at options, what materials are available, what components are required, timeline in obtaining parts, power requirements.
Students will retain presented items for their personal use.
Project assessment includes ongoing discussion and observation of their project work. Students will demonstrate skills & knowledge of electronics, DC circuits and electrical theory, soldering, de-soldering, basic circuit construction.
There will be a general knowlege Electronics Multi Choice exam later in the year, open book format and you can use phone apps.
Week 5 – Select Project, keep it achievable, you can make it more complex in your second year. Submit Creative Brief.
Week 6 – Construct a DMX-Ethernet Adaptor cable, http://nebula.wsimg.com/0c47e1771b420ed8da58cec68b0d3cc9?AccessKeyId=E9F99C3F22E876201E3C&disposition=0&alloworigin=1
Continue project work.
Extensions may be granted. Please discuss with your Lecturer before the due date.
If you miss an assessment due to illness, please contact your Lecturer.
Second Year Lighting Electronics
The Electronics 2 lighting student project is Task 5 of Praxix 2 VET UNIT PLAN and is chosen by the lighting student to allow them to design, construct and test something that could be useful in their lighting tasks.
Week 1 – Second Year Project discussion, look at options, do you want to expand on your First year project, what materials are available, what components are required, timeline in obtaining parts.
Week 2 – Select Project, keep it achievable, you can make it more complex in your Third year. Submit Creative Brief.
TASK 5: Electronics Design Project
Context & Conditions of Assessment – The Purpose of the Assessment
The Electronics Design Project will demonstrate the skills and knowledge required to conceive, develop and produce a product / design for specific application in the Lighting industry.
Assessment / Tasks Instructions
Conceive and develop a creative brief for an Electronics Project
1. Interpret creative brief
1.1. Participate in preliminary concept meetings with class group to discuss options and requirements
1.2. Identify factors that may determine and affect the design
1.3. Access and prepare relevant documentation and brief own team on requirements
2. Research design concepts and technologies
2.1. Identify and source references that may inform the design process
2.2. Analyse sources and references in context of design project
2.3. Evaluate impacts and potential of new and emerging technologies to inform the design
2.4. Collect, collate and adapt materials to develop initial design concepts
3. Generate and assess design ideas
3.1. Generate a range of ideas for designs that respond sympathetically to the brief and different design elements, and
provide creative solutions to technical issues
3.2. Discuss ideas and collaborate with lecturer to maximise their contribution to initial concepts
3.3. Analyse ideas for implications on cost and time, technical feasibility, and their suitability for brief
3.4. Provide strategic information that enhances production outcomes
4. Develop and document designs
4.1. Consult with lecturers so additional or changed requirements and new ideas are considered and incorporated
during the development of designs
4.2. Collaborate with lecturers to achieve consistent artistic interpretation
4.3. Evaluate initial concepts and select the most appropriate approach, in line with budget, research findings and
ongoing reflection and discussion
4.4. Use initial concepts as the basis for developing designs within the required timeframe that meet budget constraints,
production schedules and relevant work health and safety (WHS) requirements, and other relevant factors
4.5. Complete documentation according to production requirements and enterprise procedures
5. Finalise design
5.1. Present draft plans and specifications to lecturer in an appropriate format and within required timeframes
5.2. Participate in initial and ongoing evaluation of draft designs
5.3. Negotiate and agree to modifications to designs and undertake necessary amendments
5.4. Agree to final designs and produce documentation to support implementation
5.5. Present final design, plans and specifications to lecturer and confirm all production requirements have been met
6. Complete and Present Electronics Project
Evidence to be Gathered from the Student
Requirements for successful performance
Submit a completed Electronics Project by the due date
Present the Electronics Project to the class
Submit an Electronics Project Journal in PDF format
The Electronics Project Journal must contain the following sections;
1. The Project Brief. 1.1,1.2,1.3
2. Evidence of Research. 2.1,2.2,2.3,2.4
3. Design Concept. 3.1,3.2,3.3,3.4
4. Design Development. 4.1,4.2,4.3,4.4,4.5
5. Design Realisation. 5.1,5.2,5.3,5.4,5.5
Each section of the Journal must provide evidence of each of the points outlined above.
All PDF files will be clearly named and labelled
PDF file must include a cover page with task title, student name, student number, date and lecturer.
Format of presentation
Students will perform this task during Production.
Extensions may be granted. Please discuss with your Lecturer before the due date.
If you miss an assessment due to illness, please contact your Lecturer.
Date Due: Semester 2 Week 13
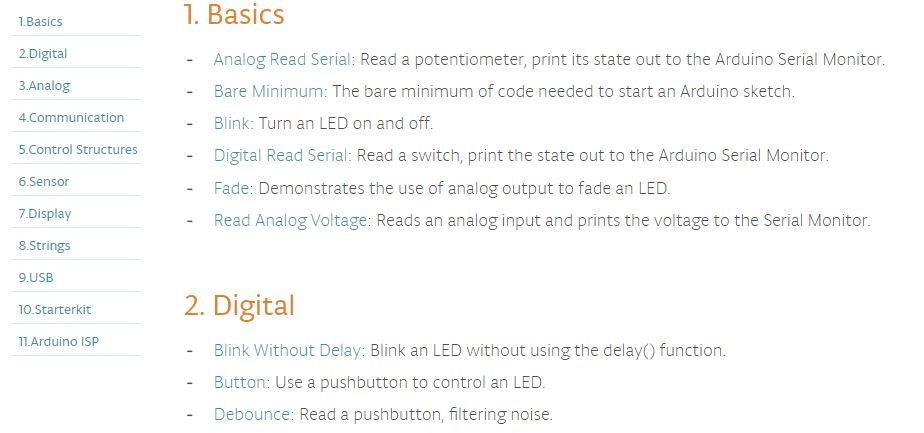
Arduino Built In Examples – Code Segments explained https://www.arduino.cc/en/Tutorial/BuiltInExamples
Has a summary listing of what each example does and links to a page with detailed description, hardware required, circuit, schematic, code and See Also.
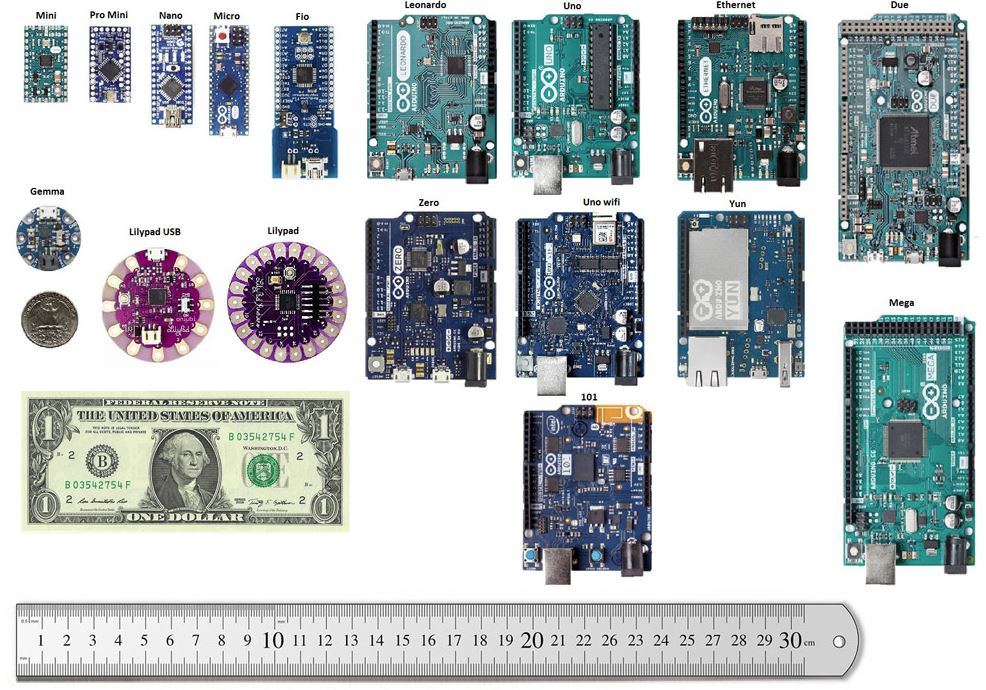
Choosing an Arduino https://electropeak.com/learn/arduino-buying-guide-how-to-choose-right-arduino-board/
A full guide to choosing the different Arduino versions.
Worth reading before selecting an Arduino for your project. Most other suppliers web sites do not have full range.
Page updated 18 October 2020